
How Smashing Magazine Manages Content: Migration From WordPress To JAMstack
![]() This article has been kindly supported by our dear friends at Netlify, an all-in-one platform for automating modern web projects. Thank you!
This article has been kindly supported by our dear friends at Netlify, an all-in-one platform for automating modern web projects. Thank you!
Every time developers talk about WordPress, their market share percentage changes. “20% of all sites are on WordPress!” “40% of all sites are on WordPress!” Whatever the percentage is, the message is the same: in terms of adoption, WordPress is MASSIVE.
So why, with that kind of adoption, would a site that’s using WordPress consider moving to JAMstack? In this two-part article series, we’ll cover what an actual WordPress migration looks like, using a case study of the very site you’re reading from right now.
We’ll talk through the gains and losses, the things we wish we knew earlier, and what we were surprised by. And then we’ll follow it up with a technical demonstration of one possible migration path, not off WordPress completely, but how you can serve decoupled WordPress so that you can have the best of both worlds: a JAMstack implementation of WordPress that gives you all the power of their dashboard and functionality, with better performance and security.
Let’s dig in!
Why?
In 2015, Netlify co-founder Mathias Biilmann and Smashing founder Vitaly Friedman talked shop. As JAMstack architecture started making rounds, Smashing has got more interested in the idea of the stack. Vitaly and Markus (former managing director at Smashing) asked Matt what would happen if Smashing migrated from their traditional WordPress/LAMPstack site to a JAMstack architecture.
As an experiment, Matt scraped all the HTML from Smashing and hosted it on Netlify, delivering the content statically from a CDN. The results were compelling — the static version is more than six times as fast on average!
This type of architecture works so well in part because pages aren’t being compiled on-demand as you visit them. Since you’re serving pre-built content directly from a Content Delivery Network, the site is already “there” and ready for the user.
Since you’re serving via CDN, you can also distribute the content across the globe — closer to potential visitors. There’s no central point of origin, which is vital in the case of any online publication that wants to be fast for all of its readers.
So the stage was set. Smashing Magazine migrated to the JAMstack — to Netlify as a platform in particular. In its 10 years of operation, Smashing had grown from a small online publication to a massive WordPress blog, selling things like books, conference tickets, and workshops.
There were a few pieces of this site:
- WordPress blog
- Rails jobs board
- Shopify store
- Another CMS for the conference site
When Netlify first began the migration, the site was suffering some performance issues, weighed down by 20K comments and thousands of articles. Smashing was also interested in authentication as part of a new subscription plan, as well as a redesign for a more modern look.
Reliability
Smashing regularly achieves what other platforms dream of: articles shared widely through an enormous community. However, when a tipping point of virility was reached for a post, Smashing regularly had issues with outages. To mitigate this, the heavy use of WordPress plugins were introduced into their stack, but they still struggled to retain good uptime metrics.
Moving to Netlify allowed the Smashing team to avoid getting database connection errors and not worry about downtime even when an article saw a huge amount of traffic. Why? Because when serving without a server, the prebuilt content doesn’t have to be generated and served — it already exists, ready to be viewed. Nothing is being requested on the spot except for the entire, static page.
Serving via CDN also allowed Smashing to sleep a little easier in terms of security. wp-login.php has long been a source of security holes and attack vectors. Prebuilt content can not be accessed in the same way and security holes are not as ubiquitous.
Cache Invalidation
Smashing had cycled through every WordPress caching plugin, with varied results and a lot of problems. Vitaly Friedman of Smashing mentions,
“The main issues we had were related to ‘Error Establishing Database Connection’ that we kept having every other week, and we literally tried every single WordPress caching plugin out there. The performance was pretty OK (overall), but we were looking to improve it further. Plus, we did want to launch Membership and connect all the different offerings — conferences, job posts, articles, books, eBooks — with one single platform, and it was remarkably difficult to achieve with WordPress in play.”
Moving to Netlify allowed the Smashing team to see instant cache invalidation while also serving cached and performant content, with no extra overhead.
When you deploy a site, HTML files are hosted on Netlify’s CDN. It’s optimized for a high cache-hit rate, and fast time to first byte, while being able to instantly invalidate all HTML files that have changed. Netlify also fingerprints all links to assets like CSS files, images, fonts, or JS files, and serves Smashing with caching headers that cache them forever. The fingerprinting guarantees they’re unique, and that if you update a new version, the newer version is served instead.
Workflow
Looking at the existing setup, one large reason for the migration was simply to unify the existing properties. Having to context shift between all of these different tech stacks and setups became a hard maintenance problem that tasked the engineers.
When previously their infrastructure was split up among so many different systems, this migration process also unified everything, keeping the main site, the conference site, the subscriptions and e-commerce section all working together instead of maintained separately with different stacks. This helped keep development costs low and developer experience working on all properties consistently.
The WordPress migration piece proved to be the largest and most delicate. Netlify tried to export the data from the WP exporter, only to find that the content had embeds that needed to be preserved, or at times were altered by plugins. In order to maintain parity with what was on the site, a series of scrapers were written, broken down by articles, assets, comments, and the homepage.
Once that was written and transformed, it was loaded into a new repo in GitHub, and Netlify CMS was used instead. What makes Netlify CMS unique is that it’s lightweight, and integrates content editors into a Git workflow — meaning it will literally pull and serve markdown files from a git repo instead of a database. In addition, Netlify CMS is platform agnostic and works with (almost) all static site generators and sites stored in GitHub.
At that time, Sara Soueidan worked for Smashing as a freelance front-end developer on their redesign. She created a library of components to build out the front-end architecture and remarked how much more simple it was to work with because she was working directly in git, even when working with the CMS.
تبلیغات میان متنی/
درب شیشه ای چیست؟ یکی از ملزومات دکوراسیون لوکس و مدرن ساختمان های امروز به حساب می آیند. قیمت درب شیشه ای را در سایت قائم الکتریک مشاهده کنید. همچنین درب ورودی ساختمان ها نیز برای حفظ امنیت عبور و مرور نیازمند تجهیزات راهبند است. قیمت راهبند را از قائم الکترونیک به راحتی دریافت کنید. تیم نکته عمومی و عامیانه این است که در شیشه ای یا همان درب شیشه ای به درب اتوماتیک شیشه ای اشاره دارند. درب شیشه ای در انواع مختلف را از قائم الکترونیک بخواهید.
تبلیغات میان متنی
-------------------------------------------------------------------------------------------------------------------------------------------
همچنین می توانید کرکره برقی و قیمت کرکره برقی و پرده برقی را در وبسایت قائم الکترونیک و از کارشناسان این شرکت استعلام کنید. ما ۲۴ ساعت شبانه روز آماده خدمت به شما عزیزان هستیم. هموطنان ایرانی همچنین می توانند انواع جک برقی و قیمت جک برقی را در سایت قائم الکترونیک دنبال کنند.
تبلیغات میان متنی
---------------------------------------------------------------------------------------------------------------------------------------------------------------------------
“Everything that I pushed to the repository is being directly applied to the pattern library which means that you don’t have to maintain two different sets of components... this type of continuity was great! All I have to do is write HTML, CSS, and JavaScript and push to the repo and everything works like magic. The workflow was fantastic.”
All of this said, Netlify CMS can sometimes be too lightweight for such a high traffic and scale use case. Smashing regularly has guest authors and a full editorial staff. Some of the rich features WordPress offers are really helpful for these kinds of highly collaborative environments.
That’s why in the following tutorial, we’ll walk you through a headless model, where you can still reap the benefits of the WordPress dashboard for content creators, but use WordPress via API and have the development rely on a git-centric workflow that easy for developers to maintain as well. Stay tuned!
Framework Choices
In the initial prototype that Matt Biilmann created, he wrote everything in minimal Preact, paired with Hugo, as he was very focused on performance. He just used props and kept everything very lightweight. As he passed the project off to be maintained by Smashing’s developer, Ilya Pukhalski, he found that Preact was lacking some features they were missing to tap into React’s ecosystem. Eventually, the benefits of Redux and other libraries outweighed the cost.
Reflecting now, Matt says he would have used Vue, which didn’t have quite the market share at the time (I swear I didn’t prompt him to say that). I asked the obvious question: why not Svelte? As performance-minded folks tend to reach for that library. He mentioned that Svelte doesn’t quite have the ecosystem Vue has yet.
When Matt reflects on whether or not he would have still used Hugo, he says that he loves Hugo, but what he found difficult for this project in particular was that it didn’t have enough of a plugin system — creating banner ads and things of that nature were not programmable enough with Hugo and he needed to inject scripts to accomplish it. These scripts tended to slow the build process down. That said, we still use Hugo for our own site at netlify.com and love it — this caveat is extremely particular to the needs of Smashing’s site in particular.
If he could do it again, he might choose either Eleventy, which has rich capabilities in terms of creating plugins and other extendable scripts. Or, if he was using Vue, Nuxt would have offered him some nice plugin capabilities while allowing being a good choice for that framework, offering server-side rendering, routing, and static generation.
Building Large Sites
There was one problem that emerged working with a site as large as Smashing and maybe you can already figure out what it is, we just touched on it. It’s true that with any large site of prebuilt pages served on a CDN, the performance is still great because we’re not building anything on the fly for the users.
But that benefit can only happen if the site is pre-built, and that process can be time-consuming. While more traditional sites will build the pages when you request them, we’re literally creating every single page in advance just in case the user might need it. It makes the performance super fast! But that time is now offloaded to development and publishing time — creating every page can take time.
This is not so much of an issue with smaller sites, but at Smashing Magazine’s scale, we need to think about that time a bit more, especially so that people can keep productivity high while actively daily creating content.
What Netlify did was create a large /production-articles folder which carried the bulk of the many 1000s of articles they were already hosting. Then, made a separate working directory called content/articles where the articles that were actively being created and edited could be placed.
This build process meant that everyone who was working on the site was working with a smaller batch of articles for local development, unhindered by waiting for the entire build. This process was managed by a gulp task to prepare the production articles, and freed Hugo up to only handle what was actively being worked on.
One of the cons of this approach is that it does still require the entire build to be run, making the process slow. At a smaller publication, this would likely matter less but at Smashing’s scale, it does slow down the publication process.
Open-Source APIs
In the beginning, we mentioned that among other things, Smashing was interested in migrating their existing e-commerce solution, handle comments outside of WordPress, and add functionality for auth. All of these pieces of functionality were built with open-source solutions that Netlify maintains, breaking them out into stateless APIs:
- GoTell An API and build tool for handling large amounts of comments.
- GoCommerce A small Go-based API for e-commerce sites that handles orders and payments.
- GoTrue A small open-source API written in Golang that can act as a self-standing API service for handling user registration and authentication for projects. It’s based on OAuth2 and JWT and will handle user signup, authentication, and custom user data.
Each one of these pieces required migration and unique factors of their own, and while they’re out of scope for this article, they’re all covered in a free book Matt co-wrote called “Modern Web Development on the JAMstack”. We’ll also do some deep dives like this one — with usable examples — into search, and authentication, in subsequent posts.
Conclusion
The migration went swimmingly. Smashingly? Er… it went well. Smashing wasn’t penalized for its own success — when a popular article came along, they could serve the content consistently, no longer bailing over large loads. Along with this, the movement to a JAMstack infrastructure brought better performance and security.
Markus Seyfferth, former CEO of Smashing Magazine, noted:
“The time to first load is so much faster than before… before we had to wait for the HTML file being served for 800ms and now it’s 80ms.”
This process was successful and like any great engineering project, lessons were learned along the way. In this next article in this series, we’ll run through a tutorial and demo for what we would recommend given what we’ve learned. If you’d like to modernize your WordPress development and reap the performance and security benefits of JAMstack, stay tuned!
Using CSCS Scripting Language For Cross-Platform Development
Our goal is not to build a platform; it’s to be cross all of them.
— Mark Zuckerberg
CSCS (Customized Scripting in C#) is an open-source scripting language implemented in C#. Syntactically it’s very similar to JavaScript, but it also has some similarities with Python. Some of these similarities are the keywords in the well-known if…elif…else construct, and also have the same variable scope definition as in Python (e.g. a variable defined inside of an if block or inside a loop will be also visible outside).
As opposed to JavaScript and Python, variables and functions in CSCS are case-insensitive. The primary goal of CSCS is to let the developer write as little code as possible. Also, the same code is used for both iOS and Android development. Additionally, CSCS can be used for Windows, Mac, and Unity development.
Note: You can read more about how Microsoft uses CSCS in their Maquette product (based on Unity) over here.
CSCS can be added to your project by embedding its C# source code into a Visual Studio Xamarin project. Unlike most other languages, you have full ownership of the CSCS source code and can easily add or modify its functionality. I’ll be sharing an example of this later on in the article.
Also, we are going to learn how to get started with CSCS and use some more advanced features that have been covered in other articles. Among these features, we are going to access a Web Service via Web Requests with JSON string parsing, and we’ll also be using SQLite on iOS and Android.
The easiest way to get started is to download a sample of a project using CSCS and start playing with the start.cscs file. This is what we’ll be doing in the next section: creating an iOS/Android app with basic GUI and events.
"Hello, World!" In CSCS
Let’s start with a relatively simple example of CSCS code that constructs a screen with a few widgets:
The image below shows the resulting user interface on an iPhone as well as an Android device after clicking on the “Hello” button and not typing anything in the “Text Edit” field:

Let’s briefly go over the code above. It starts with the AutoScale() function call, and what that does is to tell the parser that the widget sizes are relative to the screen size, i.e. they will be auto-resized (the widget will look bigger on bigger screens and smaller on smaller screens). This setting could be also overridden per widget.
Note that there is no need to create a special handler on a button click. If you define a function with name widgetName_click(), it will be used as a handler when the user clicks on a widget called widgetName (it doesn’t have to be a button, it can actually be any widget). That’s why the function buttonHi_click() will be triggered as soon as the user clicks on the button.
You may have noticed that the GUI is constructed completely in code. This is done by supplying a relative widget location when adding it. The general format of a location command is the following:
So, you can place a widget relative to other widgets on the screen. A special case of a widget is a “ROOT” widget, meaning the main screen.
After creating a location, you need to provide it as an argument to any of the following functions:
AddLabel,AddButton,AddCombobox,AddStepper,AddListView,AddTextView,AddStepper,AddImageView,AddSlider,AddPickerView,- and so on.
All of the above have the same structure:
The widget width and height will be relative to the screen size if the AutoScale() CSCS command was previously run. Also, the initial value (in case of a button) is the text shown on it. This can be changed anytime by invoking SetText(widgetName, newText).
Using Visual Studio Code To Debug CSCS
We can also use Visual Studio Code to debug CSCS scripts. If you want to develop apps for both Android and iOS, you need to use a Mac. After installing Visual Studio Code, install the CSCS Debugger and REPL extension.
In order to use the extension, add this line of code anywhere in your start.cscs CSCS script:
The following image below shows how you can use Visual Studio Code to debug and change the functionality of the “Hello, World!” app that we developed in the previous section. In the upcoming example, we’ll be adding a label and a button on the fly to the existing layout.
To do this, we just select the code to be executed by the parser and press Ctrl + 8. As a result, a label and a button will be added at the center of the screen. We also add a button handler that will update the new label with the current time on each button click.

Using SQLite In CSCS
SQLite is an ACID (Atomicity, Consistency, Isolation, Durability) type of a relational database, and was developed by Richard Hipp (the first version was released in 2000). In difference to other relational databases, like Microsoft SQL Server or Oracle Database, it’s embedded. (Embedded not only into the device, but also into the end program.) It’s included in the program as a very compact library, which is less than 500 KB in size. But two apps (released by the same developer) can read the same SQLite DB if the DB file path is known to both apps.
The advantage of SQLite is that it can be used without an extra installation on an iOS or an Android device. The disadvantage is that it obviously cannot hold as much data as a “normal” DB and also that it’s weakly typed (i.e. you can insert a string instead of an integer — it will then be converted to an integer or 0 on failure). On the other hand, the latter can be also seen as an advantage as well.
SQLite can be easily used from CSCS without extra import statements. Here’s a table that will help you get an overview of the main SQLite functions used in CSCS:
| Command | Description |
|---|---|
SQLInit(DBName) |
Initializes a database or sets a database to be used with consequent DB statements. |
SQLDBExists(DBName) |
Checks whether the DB has been initialized. Also sets the database to be used with consequent DB statements. |
SQLQuery(query) |
Executes an SQL query (a select statement). Returns a table with records. |
SQLNonQuery(nonQuery) |
Executes an SQL non-query, e.g. an update, create or delete statement. Returns number of records affected. |
SQLInsert(tableName, columnList, data) |
Inserts passed table of data of records to the specified DB table. The columnList argument has the following structure: colName1,colName2,…,colNameN |
Table 1: SQLite commands in CSCS
This is how the SQLInit() and SQLDBExists() functions are typically used:
We are going to see more examples of how you can select and insert data into an SQLite database later on. I’ll show you an example of how to write stock data that has been extracted from a Web Service into a local SQLite database.
Adding Custom Functionality To CSCS
In this section, we are going to see how you can extend the CSCS functionality. As an example, we are going to see the existing implementation of the CSCS Sleep function below.
To add custom functionality, all you need to do is create a new class by deriving from the ParserFunction class, overriding its Evaluate() method, and registering this class with the parser. Here’s a short version (without error checking):
Registration of a class with the parser can be done anywhere in the initialization stage via the following command:
That’s it! Now the Evaluate() method of the SleepFunction class will be invoked as soon as a “Sleep” token is extracted by the parser.
Note that CSCS is case insensitive (except the core control flow statements: if, elif, else, for, while, function, include, new, class, return, try, throw, catch, break, continue). This means that you can type either “sleep(100)” or “Sleep(100)” — both calls will suspend the executing thread for 100 milliseconds.
Processing JSON In CSCS
JSON (JavaScript Object Notation) is a lightweight data interchange format, consisting of attribute-value pairs and array-type pairs. It was developed by Douglas Crockford in the early 2000s (around same time when SQLite appeared as well).
In this section, we are going to learn how to parse JSON using CSCS.
The CSCS function to parse a JSON string is GetVariableFromJSON(jsonText). This function returns a hash table in which the keys are the attributes from the JSON string.
Consider the following example of a JSON string:
After invoking:
The variable a will be a hash table with the following values:
In the next section, we are going to see another example of parsing a JSON string from a Web Service.
An Example Of An App With SQLite, Web Requests And JSON
For an app using SQLite, a Web Service and JSON parsing, we are going to use Alpha Vantage Web Service. You can get an API Key for free but the free version allows accessing their web service no more than 5 times per minute.
Using Alpha Vantage, you can extract various financial data sets — including stock prices. This is what we are going to do in our sample app.
The image below shows how the Stocks apps looks on an iOS and on an Android device.

The CSCS code to build the GUI is the following:
The getDataFromDB() method will extract all the data from the SQLite database. It uses the SQL query defined as follows:
Take a look at the code below for the getDataFromDB() implementation.
Now let’s see how we get data from the Alpha Vantage Web Service. First, we initialize the data:
Next, we load stocks one by one as soon as the user clicks on the “Refresh” button:
Here’s the main CSCS function to use in order to get data from a Web Service:
The last two parameters are functions to invoke on completion of the web request. For example, in case of a failure, the following CSCS function will be called:
As a result, the user will get an error message as shown below:

But, if all is good, we are going to parse the JSON string and insert its contents into the SQLite DB.
In order to understand how we access different fields in the hash table above, let’s take a look at the actual string received from the Alpha Vantage web request:
As you can see, we get the latest date as the first element of the allDates array that consists all of the extracted dates.
Conclusion
Adding CSCS to your project is easy. All you need to do is simply embed the source code of CSCS as a module to your project — just like it’s done in a sample Xamarin project.
Do you use and extend CSCS scripting language in your projects? Leave a comment below — I’d be happy to hear from you!
FURTHER READING
If you want to explore the CSCS language a bit more, here are some of the articles I’ve written about on the topic:
- “A Split-and-Merge Expression Parser in C#,” MSDN Magazine (Oct. 2015)
- “Customizable Scripting in C#,” MSDN Magazine (Feb. 2016)
- “Writing Native Mobile Apps Using a Customizable Scripting Language,” MSDN Magazine (Feb. 2018)
- “CSCS: Customized Scripting in C#,” GitHub
- “Developing Cross-Platform Native Apps with a Functional Scripting Language,” CODE Magazine
- “Implementing A Custom Language Succinctly” (eBook)
- “Writing Native Mobile Apps in a Functional Language Succinctly” (eBook)
As an additional resource, I also recommend reading how you can improve CSCS performance by precompiling its functions.
How To Create A Card Matching Game Using Angular And RxJS
Today, I’d like to focus on data streams resulting from click events on the user interface. The processing of such clickstreams is particularly useful for applications with an intensive user interaction where many events have to be processed. I’d also like to introduce you to RxJS a bit more; it’s a JavaScript library that can be used to express event handling routines compactly and concisely in a reactive style.
What Are We Building?
Learning games and knowledge quizzes are popular both for younger and older users. An example is the game “pair matching”, where the user has to find related pairs in a mixture of images and/or text snippets.
The animation below shows a simple version of the game: The user selects two elements on the left and right side of the playing field one after the other, and in any order. Correctly matched pairs are moved to a separate area of the playing field, while any wrong assignments are immediately dissolved so that the user has to make a new selection.

In this tutorial, we will build such a learning game step by step. In the first part, we will build an Angular component that is just showing the playing field of the game. Our aim is that the component can be configured for different use cases and target groups — from an animal quiz up to a vocabulary trainer in a language learning app. For this purpose, Angular offers the concept of content projection with customizable templates, which we will make use of. To illustrate the principle, I will build two versions of the game (“game1” and “game2”) with different layouts.
In the second part of the tutorial, we will focus on reactive programming. Whenever a pair is matched, the user needs to get some sort of feedback from the app; it is this event handling that is realized with the help of the library RxJS.
-
Requirements
To follow this tutorial, the Angular CLI must be installed. -
Source Code
The source code of this tutorial can be found here (14KB).
1. Building An Angular Component For The Learning Game
HOW TO CREATE THE BASIC FRAMEWORK
First, let’s create a new project named “learning-app”. With the Angular CLI, you can do this with the command ng new learning-app. In the file app.component.html, I replace the pre-generated source code as follows:
<div style="text-align:center">
  <h1>Learning is fun!</h1>
</div>
In the next step, the component for the learning game is created. I’ve named it “matching-game” and used the command ng generate component matching-game. This will create a separate subfolder for the game component with the required HTML, CSS and Typescript files.
As already mentioned, the educational game must be configurable for different purposes. To demonstrate this, I create two additional components (game1 and game2) by using the same command. I add the game component as a child component by replacing the pre-generated code in the file game1.component.html or game2.component.html with the following tag:
<app-matching-game></app-matching-game>
At first, I only use the component game1. In order to make sure that game 1 is displayed immediately after starting the application, I add this tag to the app.component.html file:
<app-game1></app-game1>
When starting the application with ng serve --open, the browser will display the message “matching-game works”. (This is currently the only content of matching-game.component.html.)
Now, we need to test the data. In the /app folder, I create a file named pair.ts where I define the class Pair:
export class Pair {
  leftpart: string;
  rightpart: string;
  id: number;
}
A pair object comprises two related texts (leftpart and rightpart) and an ID.
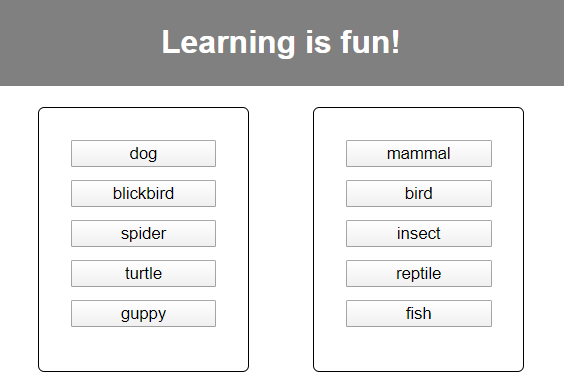
The first game is supposed to be a species quiz in which species (e.g. dog) have to be assigned to the appropriate animal class (i.e. mammal).
تبلیغات درون متنی/
اگر تمایل دارید برای شرکت خود اقدام به طراحی سایت ارزان کنید پیشنهاد می کنم ابتدا مقالات مربوط به تفاوت طراحی سایت فروشگاهی و طراحی سایت شرکتی را مطالعه کنید. من به شما پیشنهاد می کنم خدمات طراحی سایت پیام آوا را برای این کار نگاه کنید. شرکت پیام آوا بهترین و با کیفیت ترین خدمات طراحی سایت را در قالب طراحی سایت ارزان و مقرون به صرفه به شما ارائه می کند.
تبلیغات درون متنی
In the file animals.ts, I define an array with test data:
import { Pair } from './pair';
export const ANIMALS: Pair[] = [
  { id: 1, leftpart: 'dog', rightpart: 'mammal'},
  { id: 2, leftpart: 'blickbird', rightpart: 'bird'},
  { id: 3, leftpart: 'spider', rightpart: 'insect'},
  { id: 4, leftpart: 'turtle', rightpart: 'reptile' },
  { id: 5, leftpart: 'guppy', rightpart: 'fish'},
];
The component game1 needs access to our test data. They are stored in the property animals. The file game1.component.ts now has the following content:
import { Component, OnInit } from '@angular/core';
import { ANIMALS } from '../animals';
@Component({
  selector: 'app-game1',
  templateUrl: './game1.component.html',
  styleUrls: ['./game1.component.css']
})
export class Game1Component implements OnInit {
  animals = ANIMALS;
  constructor() { }
  ngOnInit() {
  }
}
THE FIRST VERSION OF THE GAME COMPONENT
Our next goal: The game component matching-game has to accept the game data from the parent component (e.g. game1) as input. The input is an array of “pair” objects. The user interface of the game should be initialized with the passed objects when starting the application.
For this purpose, we need to proceed as follows:
- Add the property
pairsto the game component using the@Inputdecorator. - Add the arrays
solvedPairsandunsolvedPairsas additional private properties of the component. (It is necessary to distinguish between already “solved” and “not yet solved” pairs.) - When the application is started (see function
ngOnInit) all pairs are still “unsolved” and are therefore moved to the arrayunsolvedPairs.
import { Component, OnInit, Input } from '@angular/core';
import { Pair } from '../pair';
@Component({
  selector: 'app-matching-game',
  templateUrl: './matching-game.component.html',
  styleUrls: ['./matching-game.component.css']
})

export class MatchingGameComponent implements OnInit {
  @Input() pairs: Pair[];
  private solvedPairs: Pair[] = [];
  private unsolvedPairs: Pair[] = [];
  constructor() { }
  ngOnInit() {
    for(let i=0; i<this.pairs.length; i++){
        this.unsolvedPairs.push(this.pairs[i]);
    }
  }
}
Furthermore, I define the HTML template of the matching-game component. There are containers for the unsolved and solved pairs. The ngIf directive ensures that the respective container is only displayed if at least one unsolved or solved pair exists.
In the container for the unsolved pairs (class container unsolved), first all left (see the left frame in the GIF above) and then all right (see the right frame in the GIF) components of the pairs are listed. (I use the ngFor directive to list the pairs.) At the moment, a simple button is sufficient as a template.
With the template expression {{{pair.leftpart}} and {{{pair.rightpart}}}, the values of the properties leftpart and rightpart of the individual pair objects are queried when iterating the pair array. They are used as labels for the generated buttons.
The assigned pairs are listed in the second container (class container solved). A green bar (class connector) indicates that they belong together.
The corresponding CSS code of the file matching-game.component.css can be found in the source code at the beginning of the article.
<div id="game">
   <div class="container unsolved" *ngIf="unsolvedPairs.length>0">
      <div class="pair_items left">
         <button *ngFor="let pair of unsolvedPairs" class="item">
             {{pair.leftpart}}
         </button>
      </div>
    <div class="pair_items right">
      <button *ngFor="let pair of unsolvedPairs" class="item">
            {{pair.rightpart}}
         </button>
    </div>
   </div>
   <div class="container solved" *ngIf="solvedPairs.length>0">
       <div *ngFor="let pair of solvedPairs" class="pair">
          <button>{{pair.leftpart}}</button>
          <div class="connector"></div>
          <button>{{pair.rightpart}}</button>
       </div>
   </div>
</div>
In the component game1, the array animals is now bound to the pairs property of the component matching-game (one-way data binding).
<app-matching-game [pairs]="animals"></app-matching-game>
The result is shown in the image below.
Obviously, our matching game is not too difficult yet, because the left and right parts of the pairs are directly opposite each other. So that the pairing is not too trivial, the right parts should be mixed. I solve the problem with a self-defined pipe shuffle, which I apply to the array unsolvedPairs on the right side (the parameter test is needed later to force the pipe to be updated):
...
<div class="pair_items right">
  <button *ngFor="let pair of unsolvedPairs | shuffle:test" class="item">
        {{pair.rightpart}}
  </button>
</div>
...
The source code of the pipe is stored in the file shuffle.pipe.ts in the app folder (see source code at the beginning of the article). Also note the file app.module.ts, where the pipe must be imported and listed in the module declarations. Now the desired view appears in the browser.
EXTENDED VERSION: USING CUSTOMIZABLE TEMPLATES TO ALLOW AN INDIVIDUAL DESIGN OF THE GAME
Instead of a button, it should be possible to specify arbitrary template snippets to customize the game. In the file matching-game.component.html I replace the button template for the left and right side of the game with an ng-template tag. I then assign the name of a template reference to the property ngTemplateOutlet. This gives me two placeholders, which are replaced by the content of the respective template reference when rendering the view.
We are here dealing with the concept of content projection: certain parts of the component template are given from outside and are “projected” into the template at the marked positions.
When generating the view, Angular must insert the game data into the template. With the parameter ngTemplateOutletContext I tell Angular that a variable contextPair is used within the template, which should be assigned the current value of the pair variable from the ngFor directive.
The following listing shows the replacement for the container unsolved. In the container solved, the buttons have to be replaced by the ng-template tags as well.
<div class="container unsolved" *ngIf="unsolvedPairs.length>0">
<div class="pair_items left">
    <div *ngFor="let pair of unsolvedPairs" class="item">
         <ng-template [ngTemplateOutlet]="leftpart_temp"
             [ngTemplateOutletContext]="{contextPair: pair}">
       </ng-template>
    </div>
</div>
<div class="pair_items right">
    <div *ngFor="let pair of unsolvedPairs | shuffle:test" class="item">
         <ng-template [ngTemplateOutlet]="leftpart_temp"
           [ngTemplateOutletContext]="{contextPair: pair}">
       </ng-template>
    </div>
</div>
</div>
...
In the file matching-game.component.ts, the variables of both template references (leftpart_temp and rightpart_temp) must be declared. The decorator @ContentChild indicates that this is a content projection, i.e. Angular now expects that the two template snippets with the respective selector (leftpart or rightpart) are provided in the parent component between the tags <app-matching-game></app-matching-game> of the host element (see @ViewChild).
@ContentChild('leftpart', {static: false}) leftpart_temp: TemplateRef<any>;
@ContentChild('rightpart', {static: false}) rightpart_temp: TemplateRef<any>;
Don’t forget: The types ContentChild and TemplateRef must be imported from the core package.
In the parent component game1, the two required template snippets with the selectors leftpart and rightpart are now inserted.
For the sake of simplicity, I will reuse the buttons here again:
<app-matching-game [pairs]="animals">
    <ng-template #leftpart let-animalPair="contextPair">
          <button>{{animalPair.leftpart}}</button>
       </ng-template>
    <ng-template #rightpart let-animalPair="contextPair">
          <button>{{animalPair.rightpart}}</button>
       </ng-template>
</app-matching-game>
The attribute let-animalPair="contextPair" is used to specify that the context variable contextPair is used in the template snippet with the name animalPair.
The template snippets can now be changed to your own taste. To demonstrate this I use the component game2. The file game2.component.ts gets the same content as game1.component.ts. In game2.component.html I use an individually designed div element instead of a button. The CSS classes are stored in the file game2.component.css.
<app-matching-game [pairs]="animals">
    <ng-template #leftpart let-animalPair="contextPair">
          <div class="myAnimal left">{{animalPair.leftpart}}</div>
       </ng-template>
    <ng-template #rightpart let-animalPair="contextPair">
          <div class="myAnimal right">{{animalPair.rightpart}}</div>
       </ng-template>
</app-matching-game>
After adding the tags <app-game2></app-game2> on the homepage app.component.html, the second version of the game appears when I start the application:

game2The design possibilities are now almost unlimited. It would be possible, for example, to define a subclass of Pair that contains additional properties. For example, image addresses could be stored for the left and/or right parts. The images could be displayed in the template along with the text or instead of the text.
2. Control Of User Interaction With RxJS
ADVANTAGES OF REACTIVE PROGRAMMING WITH RXJS
To turn the application into an interactive game, the events (e.g. mouse click events) that are triggered at the user interface must be processed. In reactive programming, continuous sequences of events, so-called “streams”, are considered. A stream can be observed (it is an “observable”), i.e. there can be one or more “observers” or “subscribers” subscribing to the stream. They are notified (usually asynchronously) about every new value in the stream and can react to it in a certain way.
With this approach, a low level of coupling between the parts of an application can be achieved. The existing observers and observables are independent of each other and their coupling can be varied at runtime.
The JavaScript library RxJS provides a mature implementation of the Observer design pattern. Furthermore, RxJS contains numerous operators to convert streams (e.g. filter, map) or to combine them into new streams (e.g. merge, concat). The operators are “pure functions” in the sense of functional programming: They do not produce side effects and are independent of the state outside the function. A program logic composed only of calls to pure functions does not need global or local auxiliary variables to store intermediate states. This, in turn, promotes the creation of stateless and loosely coupled code blocks. It is therefore desirable to realize a large part of the event handling by a clever combination of stream operators. Examples of this are given in the section after next, based on our matching game.
INTEGRATING RXJS INTO THE EVENT HANDLING OF AN ANGULAR COMPONENT
The Angular framework works with the classes of the RxJS library. RxJS is therefore automatically installed when Angular is installed.
The image below shows the main classes and functions that play a role in our considerations:

| Class Name | Function |
|---|---|
| Observable (RxJS) | Base class that represents a stream; in other words, a continuous sequence of data. An observable can be subscribed to. The pipe function is used to apply one or more operator functions to the observable instance. |
| Subject (RxJS) | The subclass of observable provides the next function to publish new data in the stream. |
| EventEmitter (Angular) | This is an angular-specific subclass that is usually only used in conjunction with the @Output decorator to define a component output. Like the next function, the emit function is used to send data to the subscribers. |
| Subscription (RxJS) | The subscribe function of an observable returns a subscription instance. It is required to cancel the subscription after using the component. |
With the help of these classes, we want to implement the user interaction in our game. The first step is to make sure that an element that is selected by the user on the left or right side is visually highlighted.
The visual representation of the elements is controlled by the two template snippets in the parent component. The decision how they are displayed in the selected state should therefore also be left to the parent component. It should receive appropriate signals as soon as a selection is made on the left or right side or as soon as a selection is to be undone.
For this purpose, I define four output values of type EventEmitter in the matching-game.component.ts file. The types Output and EventEmitter have to be imported from the core package.
@Output() leftpartSelected = new EventEmitter<number>();
@Output() rightpartSelected = new EventEmitter<number>();
@Output() leftpartUnselected = new EventEmitter();
@Output() rightpartUnselected = new EventEmitter();
In the template matching-game.component.html, I react to the mousedown event on the left and right side, and then send the ID of the selected item to all receivers.
<div *ngFor="let pair of unsolvedPairs" class="item" (mousedown)="leftpartSelected.emit(pair.id)">
...
<div *ngFor="let pair of unsolvedPairs | shuffle:test" class="item" (mousedown)="rightpartSelected.emit(pair.id)">
In our case, the receivers are the components game1 and game2. There you can now define the event handling for the events leftpartSelected, rightpartSelected, leftpartUnselected and rightpartUnselected. The variable $event represents the emitted output value, in our case the ID. In the following you can see the listing for game1.component.html, for game2.component.html the same changes apply.
<app-matching-game [pairs]="animals" (leftpartSelected)="onLeftpartSelected($event)" (rightpartSelected)="onRightpartSelected($event)" (leftpartUnselected)="onLeftpartUnselected()" (rightpartUnselected)="onRightpartUnselected()"> <ng-template #leftpart let-animalPair="contextPair">
<button [class.selected]="leftpartSelectedId==animalPair.id">
{{animalPair.leftpart}}
</button>
</ng-template>
<ng-template #rightpart let-animalPair="contextPair">
<button [class.selected]="rightpartSelectedId==animalPair.id">
{{animalPair.rightpart}}
</button>
</ng-template>
</app-matching-game>
In game1.component.ts (and similarly in game2.component.ts), the event handler functions are now implemented. I store the IDs of the selected elements. In the HTML template (see above), these elements are assigned the class selected. The CSS file game1.component.css defines which visual changes this class will bring about (e.g. color or font changes). Resetting the selection (unselect) is based on the assumption that the pair objects always have positive IDs.
onLeftpartSelected(id:number):void{
    this.leftpartSelectedId = id;
}
onRightpartSelected(id:number):void{
    this.rightpartSelectedId = id;
}
onLeftpartUnselected():void{
    this.leftpartSelectedId = -1;
}
onRightpartUnselected():void{
    this.rightpartSelectedId = -1;
}
In the next step, event handling is required in the matching game component. It must be determined if an assignment is correct, that is, if the left selected element matches the right selected element. In this case, the assigned pair can be moved into the container for the resolved pairs.
I would like to formulate the evaluation logic using RxJS operators (see the next section). For preparation, I create a subject assignmentStream in matching-game.component.ts. It should emit the elements selected by the user on the left or right side. The goal is to use RxJS operators to modify and split the stream in such a way that I get two new streams: one stream solvedStream which provides the correctly assigned pairs and a second stream failedStream which provides the wrong assignments. I would like to subscribe to these two streams with subscribe in order to be able to perform appropriate event handling in each case.
I also need a reference to the created subscription objects, so that I can cancel the subscriptions with “unsubscribe” when leaving the game (see ngOnDestroy). The classes Subject and Subscription must be imported from the package “rxjs”.
private assignmentStream = new Subject<{pair:Pair, side:string}>();

private solvedStream = new Observable<Pair>();
private failedStream = new Observable<string>();

private s_Subscription: Subscription;
private f_Subscription: Subscription;

ngOnInit(){

  ...
  //TODO: apply stream-operators on
  //leftpartClicked und rightpartClicked
  this.s_Subscription = this.solvedStream.subscribe(pair =>
  handleSolvedAssignment(pair));
  this.f_Subscription = this.failedStream.subscribe(() =>
  handleFailedAssignment());
}

ngOnDestroy() {
   this.s_Subscription.unsubscribe();
   this.f_Subscription.unsubscribe();
}
If the assignment is correct, the following steps are done:
- The assigned pair is moved to the container for the solved pairs.
- The events
leftpartUnselectedandrightpartUnselectedare sent to the parent component.
No pair is moved if the assignment is incorrect. If the wrong assignment was executed from left to right (side1 has the value left), the selection should be undone for the element on the left side (see the GIF at the beginning of the article). If an assignment is made from right to left, the selection is undone for the element on the right side. This means that the last element that was clicked on remains in a selected state.
For both cases, I prepare the corresponding handler functions handleSolvedAssignment and handleFailedAssignment (remove function: see source code at the end of this article):
private handleSolvedAssignment(pair: Pair):void{
   this.solvedPairs.push(pair);
   this.remove(this.unsolvedPairs, pair);
   this.leftpartUnselected.emit();
   this.rightpartUnselected.emit();
   //workaround to force update of the shuffle pipe
   this.test = Math.random() * 10;
}
private handleFailedAssignment(side1: string):void{

   if(side1=="left"){
        this.leftpartUnselected.emit();
   }else{
        this.rightpartUnselected.emit();
   }

}
Now we have to change the viewpoint from the consumer who subscribes to the data to the producer who generates the data. In the file matching-game.component.html, I make sure that when clicking on an element, the associated pair object is pushed into the stream assignmentStream. It makes sense to use a common stream for the left and right side because the order of the assignment is not important for us.
<div *ngFor="let pair of unsolvedPairs" class="item" (mousedown)="leftpartSelected.emit(pair.id)"
(click)="assignmentStream.next({pair: pair, side: 'left'})">
...
<div *ngFor="let pair of unsolvedPairs | shuffle:test" class="item" (mousedown)="rightpartSelected.emit(pair.id)"
(click)="assignmentStream.next({pair: pair, side: 'right'})">
Design Of The Game Interaction With RxJS Operators
All that remains is to convert the stream assignmentStream into the streams solvedStream and failedStream. I apply the following operators in sequence:
pairwise
There are always two pairs in an assignment. The pairwise operator picks the data in pairs from the stream. The current value and the previous value are combined into a pair.
From the following stream…
„{pair1, left}, {pair3, right}, {pair2, left}, {pair2, right}, {pair1, left}, {pair1, right}“
…results this new stream:
„({pair1, left}, {pair3, right}), ({pair3, right}, {pair2, left}), ({pair2, left}, {pair2, right}), ({pair2, right}, {pair1, left}), ({pair1, left}, {pair1, right})“
For example, we get the combination ({pair1, left}, {pair3, right}) when the user selects dog (id=1) on the left side and insect (id=3) on the right side (see array ANIMALS at the beginning of the article). These and the other combinations result from the game sequence shown in the GIF above.
filter
You have to remove all combinations from the stream that were made on the same side of the playing field like ({pair1, left}, {pair1, left}) or ({pair1, left}, {pair4, left}).
The filter condition for a combination comb is therefore comb[0].side != comb[1].side.
partition
This operator takes a stream and a condition and creates two streams from this. The first stream contains the data that meets the condition and the second stream contains the remaining data. In our case, the streams should contain correct or incorrect assignments. So the condition for a combination comb is comb[0].pair===comb[1].pair.
The example results in a „correct” stream with
({pair2, left}, {pair2, right}), ({pair1, left}, {pair1, right})
and a “wrong” stream with
({pair1, left}, {pair3, right}), ({pair3, right}, {pair2, left}), ({pair2, right}, {pair1, left})
map
Only the individual pair object is required for further processing of a correct assignment, such as pair2. The map operator can be used to express that the combination comb should be mapped to comb[0].pair. If the assignment is incorrect, the combination comb is mapped to the string comb[0].side because the selection should be reset on the side specified by side.
The pipe function is used to concatenate the above operators. The operators pairwise, filter, partition, map must be imported from the package rxjs/operators.
ngOnInit() {
   ...
   const stream = this.assignmentStream.pipe(
                   pairwise(),
                   filter(comb => comb[0].side != comb[1].side)
                  );
   //pipe notation leads to an error message (Angular 8.2.2, RxJS 6.4.0)
   const [stream1, stream2] = partition(comb =>
                                        comb[0].pair === comb[1].pair)(stream);
   this.solvedStream = stream1.pipe(
                         map(comb => comb[0].pair)
                       );
   this.failedStream = stream2.pipe(
                         map(comb => comb[0].side)
                       );
   this.s_Subscription = this.solvedStream.subscribe(pair =>
                             this.handleSolvedAssignment(pair));
   this.f_Subscription = this.failedStream.subscribe(side =>
                             this.handleFailedAssignment(side));
}
Now the game already works!
By using the operators, the game logic could be described declaratively. We only described the properties of our two target streams (combined into pairs, filtered, partitioned, remapped) and did not have to worry about the implementation of these operations. If we had implemented them ourselves, we would also have had to store intermediate states in the component (e.g. references to the last clicked items on the left and right side). Instead, the RxJS operators encapsulate the implementation logic and the required states for us and thus raise the programming to a higher level of abstraction.
Conclusion
Using a simple learning game as an example, we tested the use of RxJS in an Angular component. The reactive approach is well suited to process events that occur on the user interface. With RxJS, the data needed for event handling can be conveniently arranged as streams. Numerous operators, such as filter, map or partition are available for transforming the streams. The resulting streams contain data that is prepared in its final form and can be subscribed to directly. It requires a little skill and experience to select the appropriate operators for the respective case and to link them efficiently. This article should provide an introduction to this.
FURTHER RESOURCES
- “The Introduction To Reactive Programming You’ve Been Missing,” written by André Staltz
RELATED READING ON SMASHINGMAG:
تبلیغات میان متنی
سئو سایت برای موتورهای جست و جو و همچنین تبلیغات گوگل ادوردز از جمله مهمترین روش ها برای بیشتر دیده شدن سایت شما به حساب می آید. شرکت پیام آوا خدمات طراحی سایت تهران و سئو را با مناسب ترین قیمت به شما ارائه می دهد. بازاریابی و تبلیغات به رکن اساسی جامعه امروز ما تبدیل شده است.
تبلیغات میان متنی
Article sans titre
This is the start of a new series here at Smashing Magazine concentrating on CSS Grid Layout. While Grid has been available in browsers since 2017, many developers won’t have had a chance to use it on a project yet. There seem to be a lot of new properties and values associated with CSS Grid Layout. This can make it seem overwhelming. However, quite a lot of the specification details alternate ways to do things, meaning that you don’t have to learn the entire spec to get started. This series aims to take you from grid novice to expert — with lots of practical usage tips along the way.
This initial article will cover what happens when you create a grid container and the various properties that you can use on the parent element to control that grid. You will discover that there are several use cases that are fulfilled only with the properties that you apply to the grid container.
In this article, we will cover:
- Creating a grid container with
display: gridordisplay: inline-grid, - Setting up columns and rows with
grid-template-columnsandgrid-template-rows, - Controlling the size of implicit tracks with
grid-auto-columnsandgrid-auto-rows.
OVERFLOW AND DATA LOSS IN CSS
CSS is designed to keep your content readable. Let’s explore situations in which you might encounter overflow in your web designs and how CSS has evolved to create better ways to manage and design around unknown amounts of content.Read article →
تبلیغات درون متنی/
اگر تمایل دارید برای شرکت خود اقدام به طراحی سایت ارزان کنید پیشنهاد می کنم ابتدا مقالات مربوط به تفاوت طراحی سایت شرکتی و طراحی سایت فروشگاهی را مطالعه کنید. من به شما پیشنهاد می کنم خدمات طراحی سایت پیام آوا را برای این کار نگاه کنید. شرکت پیام آوا بهترین و با کیفیت ترین خدمات طراحی سایت را در قالب طراحی سایت ارزان و مقرون به صرفه به شما ارائه می کند.
تبلیغات درون متنی
Creating A Grid Container
Grid, like Flexbox, is a value of the CSS display property. Therefore to tell the browser that you want to use grid layout you use display: grid. Having done this, the browser will give you a block-level box on the element with display: grid and any direct children will start to participate in a grid formatting context. This means they behave like grid items, rather than normal block and inline elements.
However, you may not immediately see a difference on your page. As you haven’t created any rows or columns, you have a one-column grid. Enough rows are being generated to hold all of your direct children, and they are displaying one after the other in that single column. Visually they look just like block elements.
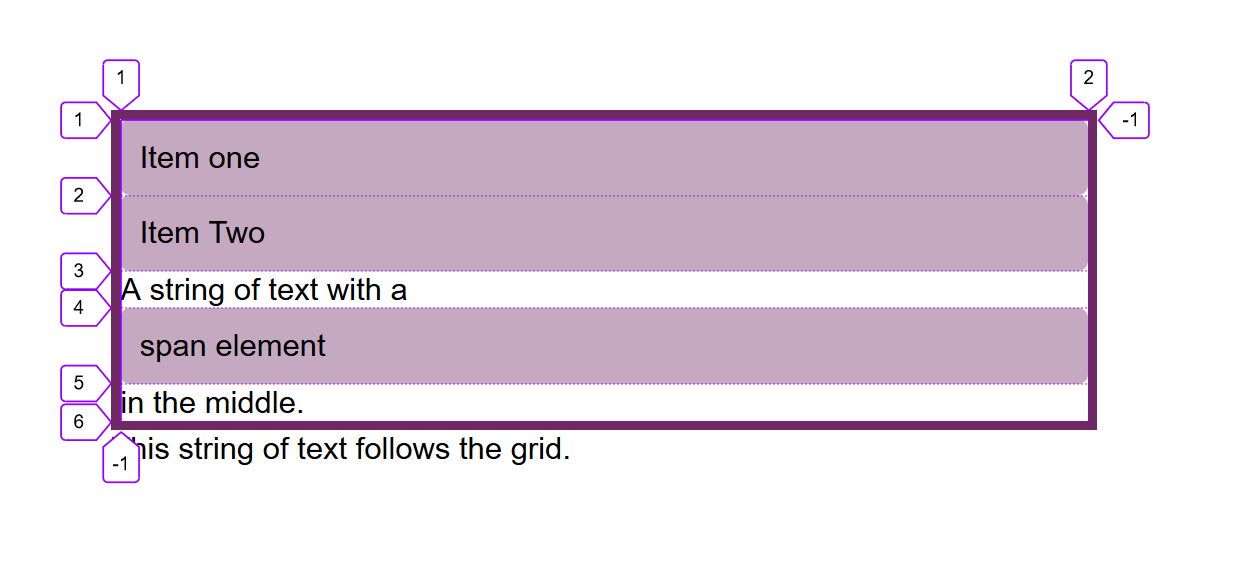
You will see a difference if you had any string of text, not wrapped in an element, and a direct child of the grid container, as the string will be wrapped in an anonymous element and become a grid item. Any element which is normally an inline element, such as a span, will also become a grid item once its parent is a grid container.
The example below has two block-level elements, plus a string of text with a span in the middle of the string. We end up with five grid items:
- The two
divelements, - The string of text before the span,
- The span,
- The string of text after the span.
If you inspect the grid using the Firefox Grid Inspector, you can see the five-row tracks that have been created for the items.
You can also create an inline grid by using display: inline-grid; in this case, your grid container becomes an inline-level box. However, the direct children are still grid items and behave in the same way as grid items inside a block-level box (it is only the outer display type). That is why the grid container behaves the way it does above when it is alongside other boxes on the page.
This next example has a grid followed by a string of text, as this is an inline-level grid, the text can display alongside it. Inline-level things do not stretch to take up all the space in the inline dimension in that way that block-level things do.
Note: In the future, we will be able to better describe our layout by using display: block grid in order to create our block-level container, and display: inline grid to create an inline-level container. You can read about this change to the display specification in my article, “Digging Into The DIsplay Property: The Two Values Of Display”.
Columns And Rows
To get something that looks like a grid, we will need to add columns and rows. These are created using the grid-template-columns and grid-template-rows properties. These properties are defined in the spec as accepting a value called a track-list.
These properties specify, as a space-separated track list, the line names and track sizing functions of the grid. The grid-template-columns property specifies the track list for the grid’s columns, while grid-template-rows specifies the track list for the grid’s rows.
Some valid track-list values are as follows:
grid-template-columns: 100px 100px 200px; |
Creates a three-column grid: The first column is 100px, the second 100px, the third 200px. |
grid-template-columns: min-content max-content fit-content(10em) |
Creates a three-column grid: The first column is the min-content size for that track, the second the max-content size. The third is either max-content unless the content is larger than 10em, in which case it is clamped to 10em. |
grid-template-columns: 1fr 1fr 1fr; |
Creates a three-column grid using the fr unit. The available space in the grid container is divided into three and shared between the three columns. |
grid-template-columns: repeat(2, 10em 1fr); |
Creates a four-column grid with a repeating pattern of 10em 1fr 10em 1fr as the track-list in the repeat statement is repeated twice. |
grid-template-columns: repeat(auto-fill, 200px); |
Fills the container with as many 200px columns as will fit leaving a gap at the end if there is spare space. |
grid-template-columns: repeat(auto-fill, minmax(200px, 1fr)); |
Fills the container with as many 200px columns as will fit then distributes the remaining space equally between the created columns. |
grid-template-columns: [full-start] 1fr [content-start] 3fr [content-end] 1fr [full-end]; |
Creates a three-column grid: The first and third columns have 1 part each of the available space while the middle column has 3 parts. The lines are named by putting line names in square brackets. |
As you can see there are many ways to create a track listing! Let’s have a look at exactly how these all work, with a few tips in terms of why you might use each one.
USING LENGTH UNITS
You can use any length units, or a percentage to create your tracks. If the size of the tracks adds up to less than is available in the grid container, then by default the tracks will line up at the start of the container and the spare space will go to the end. This is because the default value of align-content and justify-content is start. You can space out the grid tracks, or move them to the end of the container using the alignment properties, which I explain in detail in my article “How To Align Things In CSS”.
You can also use the keywords min-content, max-content and fit-content(). Using min-content will give you a track that is as small as it can be without causing overflow. Therefore, when used as a column size, the content will softly wrap wherever possible. The track becoming the size of the longest word in the column or largest fixed-size element.
Using max-content will cause the content to not do any soft-wrapping at all. In a column, any string of text will unwrap which may cause overflow.
The fit-content keyword can only be used by passing in a value. That value becomes the max that this track will grow to. Therefore, the track will act like max-content with the content unwrapping and stretching out until it hits the value you passed in. At that point, it will start wrapping as normal. So your track may be smaller than the value you pass in, but never larger.
You can find out more about sizing in Grid and other layout methods in my article “How Big Is That Box? Understanding Sizing In CSS Layout”.
If you end up with tracks that take up more space than you have in your container, they will overflow. If you use percentages then, as with percentage-based float or flex layouts, you will need to take care that the total percentage is not more than 100% if you want to avoid overflow.
THE fr UNIT
Grid Layout includes a method that can save you calculating percentages for yourself — track sizing with the fr unit. This unit isn’t a length, and therefore can’t be combined with calc(); it is a flex unit and represents the available space in the grid container.
This means that with a track-list of 1fr 1fr 1fr; the available space is divided into three and shared evenly between the tracks. With a track-list of 2fr 1fr 1fr, the available space is divided into four and two parts are given to track one — one part each to tracks two and three.
Something to watch out for is that what is being shared out by default is available space which is not the total space in the container. If any of your tracks contain a fixed-size element or a long word that can’t be wrapped, this will be laid out before the space is shared out.
In the next example, I removed the spaces between the words of ItemThree. This made a long unbreakable string so space distribution happens after the layout of that item has been accounted for.
You can mix the fr unit with fixed length tracks, and this is where it becomes very useful. For example, you could have a component with two fixed-sized columns and a center area that stretches:
You can have a component with one track set to fit-content(300px) and the other to 1fr. This makes for a component that can have something smaller than 300px in the first track, in which case it only takes the space it needs and the fr unit expands to take up the rest of the space.
If you add something larger (such as an image with max-width: 100%), the first track will stop growing at 300px and the fr unit takes the rest of the space. Mixing the fr unit with fit-content is a way to make some very flexible components for your site.
THE REPEAT() FUNCTION
Using repeat() in your track-list can save typing out the same value or values over and over again. For example the following two lines are the same:
When using repeat() the value before the column is the number of times to repeat the track-list that comes after the comma. That track-list can be multiple values. This means you can repeat a pattern of tracks.
You can use the repeat() function for part of a track-list. For example, the following line would give you a 1fr track, 3 200px tracks, and a final 1fr track.
In addition to a number before the comma to indicate a fixed number of times to repeat the pattern, you can also use the keywords auto-fill or auto-fit. Using one of these keywords means that instead of a fixed number of tracks, your grid container will be filled with as many tracks as will fit.
Using a fixed-length unit means that, unless the container is able to be exactly divided by that size, you will end up with some spare space remaining. In the example above my container is 500px wide, so I get two 200px tracks plus space at the end.
We can use another grid function to make the value a minimum, with any spare space distributed across all of the tracks. The minmax() function takes a minimum and a maximum size. With a minimum of 200px and a max of 1fr, we get as many 200px tracks as will fit and because the max is 1fr, which we already know will share out the space evenly, the extra is distributed across the tracks.
I mentioned there are two possible keywords: auto-fill and auto-fit. If you have enough content to fill the first row of cells, then these will behave in exactly the same way. If, however, you do not (e.g. if we remove all but one item inside the container above), then they behave differently.
Using auto-fill will maintain the available track sizing even if there is no content to go into it.
If, instead, you use auto-fit, the empty tracks will be collapsed:
By using the Firefox Grid Inspector, you can see that the tracks are still there, but have been collapsed to zero. The end line of our grid is still line 3 as we can fit two tracks.

NAMED LINES
My final example above used the named lines approach. When using Grid. you always have line numbers, however, you can also name the lines. Lines are named inside square brackets. You can have multiple names for one line; in that case, a space separates them. For example, in the following track-list, all of my lines have two names.
You can name your lines anything that you like, except the word span as that is a reserved word due to being used when placing items on the grid.
Note: In the next article in this series, I’ll be talking more about line-based placement and how named lines are used. In the meantime, read my article on “Naming Things in CSS Grid Layout” to help you learn more on the topic.
The Explicit Vs The Implicit Grid
When creating a grid using grid-template-columns and grid-template-rows with a track-list, you are creating what is referred to as the explicit grid. This is the grid you have defined which has the sizing you have chosen for each track.
If you have more items than will fit, or place an item so it falls outside of the bounds of the grid you have created, Grid will create tracks in the implicit grid. These implicit tracks will be auto-sized by default. We saw this implicit grid in action when I declared display: grid on the parent element and grid created rows, one for each item. I didn’t define these rows, but as there were grid items, the row tracks were created to give them somewhere to go.
You can set a size for implicit rows or columns by using the grid-auto-rows or grid-auto-columns properties. These properties take a track-listing, so if you want all implicit columns to be at least 200 pixels tall but grow if there is more content, you could use the following:
If you want the first implicit row to be auto-sized, and the second to be min-content sized, and so on (until all of the grid items have been accommodated), you can pass in multiple values:
grid-auto-rows: auto 100px
Using A Grid With Auto-Placement
Creating a grid (and allowing the browser to auto-place items) gets you a long way in terms of the useful patterns you can achieve. We have not yet looked at placing items on the grid, but many layouts that make use of Grid don’t do any placement. They simply rely on placing the items in source order — one in each grid cell.
If you are new to CSS Grid, then playing with different track sizes and seeing how the items place themselves into the cells you create is a great way to start.
تبلیغات میان متنی
سئو سایت برای موتورهای جست و جو و همچنین تبلیغات گوگل ادوردز از جمله مهمترین روش ها برای بیشتر دیده شدن سایت شما به حساب می آید. شرکت پیام آوا خدمات طراحی سایت تهران و سئو را با مناسب ترین قیمت به شما ارائه می دهد. بازاریابی و تبلیغات به رکن اساسی جامعه امروز ما تبدیل شده است.
تبلیغات میان متنی
The Split Personality Of Brutalist Web Development
Of all the design trends to hit the Internet in recent years, brutalism is surely the most eye-catching, and the most poorly defined. A variety of major brands have embraced ‘brutalist’ aesthetics online. There are even directories for those interested in seeing a selection of them in one place. The style has well and truly entered the mainstream.
Indeed, brutalist web design has grown so quickly that there does not seem to be a clear consensus on what the style actually is. To some it means practicality, to others audacity. Much like the architecture it takes its name from, brutalist web development has become two competing philosophies in one. Neither is necessarily ‘right’, but knowing the difference is important. It may even be sensible to start calling them different things.
A Brief(Ish) History Of Brutalism
Before we get ahead of ourselves, let’s recap the term ‘brutalist’ — where it came from and what it means. Brutalism is a style of architecture that took off after World War II, reaching its peak in the ‘50s and ‘60s. Championing simple, geometric designs and bared building materials, the trend was in large part a reaction against the ornate, over-designed structures of preceding decades.
The name comes from béton brut, which is French for raw or rough concrete. Concrete is a common material for brutalist structures, lending itself as it does to the style’s no-frills approach. Other materials can be and are used, but concrete is especially common. Whatever structures are made of, embellishments are deemed unnecessary. The form and the materials are enough.
The United Kingdom, with its fondness for grey, drab things, particularly took to the style. Notable examples of brutalist architecture here include the Royal National Theatre, the Barbican Estate, and Balfron Tower. It has proven especially popular for public buildings — libraries, theatres, universities, housing estates, and so on.

Although there is not a catch-all definition that everyone agrees on, deference is often paid to English architectural critic Rayner Barnam, whose 1955 essay ‘On the New Brutalism’ attempted to outline the core ideas of the style. In anticipation of those of you who would not read the whole thing, Barnham boiled the philosophy down to the following:
In the last resort what characterizes the New Brutalism in architecture as in painting is precisely its brutality, its je-m’ en-foutisme, its bloody-mindedness.
Loosely translated, je-m’ en-foutisme translates as ‘don’t give a damn attitude. To be sure, brutalist buildings are unconcerned about conventional standards of beauty. They are also rather divisive. Where some gush over their firm, utilitarian character, others decry ugliness, impersonality, and, well, brutality.
Love it or hate it, brutalist architecture celebrates rawness. Indeed, Barnam opened his essay with a quote by Swiss-French architect Le Corbusier: “Architecture is the establishing of moving relationships with raw materials.” Le Corbusier’s Unité d'habitation housing designs inspired a generation of brutalist architects.
تبلیغات درون متنی/
اگر تمایل دارید برای شرکت خود اقدام به طراحی سایت کنید پیشنهاد می کنم ابتدا مقالات مربوط به تفاوت طراحی سایت شرکتی و طراحی سایت فروشگاهی را مطالعه کنید. من به شما پیشنهاد می کنم خدمات طراحی سایت پیام آوا را برای این کار نگاه کنید. شرکت پیام آوا بهترین و با کیفیت ترین خدمات طراحی سایت را در قالب طراحی سایت ارزان و مقرون به صرفه به شما ارائه می کند.
تبلیغات درون متنی

So in short, brutalist architecture not only reduces construction to its fundamental materials, it finds beauty in that simplicity. Critics say it’s a bit in your face, a bit impersonal, a bit totalitarian even. The dual meaning of ‘raw’ and ‘brutal’ has clouded the definition, but as a rule, the goal is rawness and the result is perceived by some as brutal.
The style has waned in popularity since its postwar heyday, but it endures as one of the most distinctive around. A good few have attained listed status, and I for one am glad they have. A city of brutalist buildings would be a bit much, but a city without any is poorer for it.
FURTHER READING
- #SOSARCHITECTURE, an online archive of brutalist buildings
- ‘The incredible hulks: Jonathan Meades' A-Z of brutalism’ for The Guardian
- Wikipedia’s list of brutalist structures
Practicality Or Audacity?
So what’s all this got to do with web development? The philosophy, mainly, and the way it has splintered. Brutalism has found new life online, especially in the last three or four years. A slew of sites have taken on the brutalist moniker, and with the trend’s rise have come accompanying aw(ww)ards, articles, and directories.
Browsing through these things you may well get the impression that not everyone is talking about the same thing. That’s because they aren’t. In the world of web development, ‘brutalist’ has grown to encompass a variety of styles. It’s a disservice to designers to keep lumping together such different approaches. I have separated web brutalism into two types below, but as we shall see even that may not be enough.
TYPE ONE: L'INTERNET BRUT
The first type of brutalist web design has much more in common with its architectural forebears. Think of it as l'Internet brut, where the raw materials are HTML and, to a lesser extent, CSS. The backgrounds are light, the text is black, and the hyperlinks are blue. There’s some wriggle room, but that’s the gist of it. No faffing about. Short of displaying actual code you couldn’t get much rougher.

There are countless examples of this style, big and small. The first ever website is an inadvertent disciple, while more recently Brutalist Web Design by programmer David Bryant Copeland puts forward a lovely little manifesto for the style.
Going up in the world, other websites with strong brutalist streaks include:
Although the raw materials of these sites are very similar, they don’t all look the same. They are shaped around their content and purpose. Like their architectural cousins, there’s actually a huge variety in form.
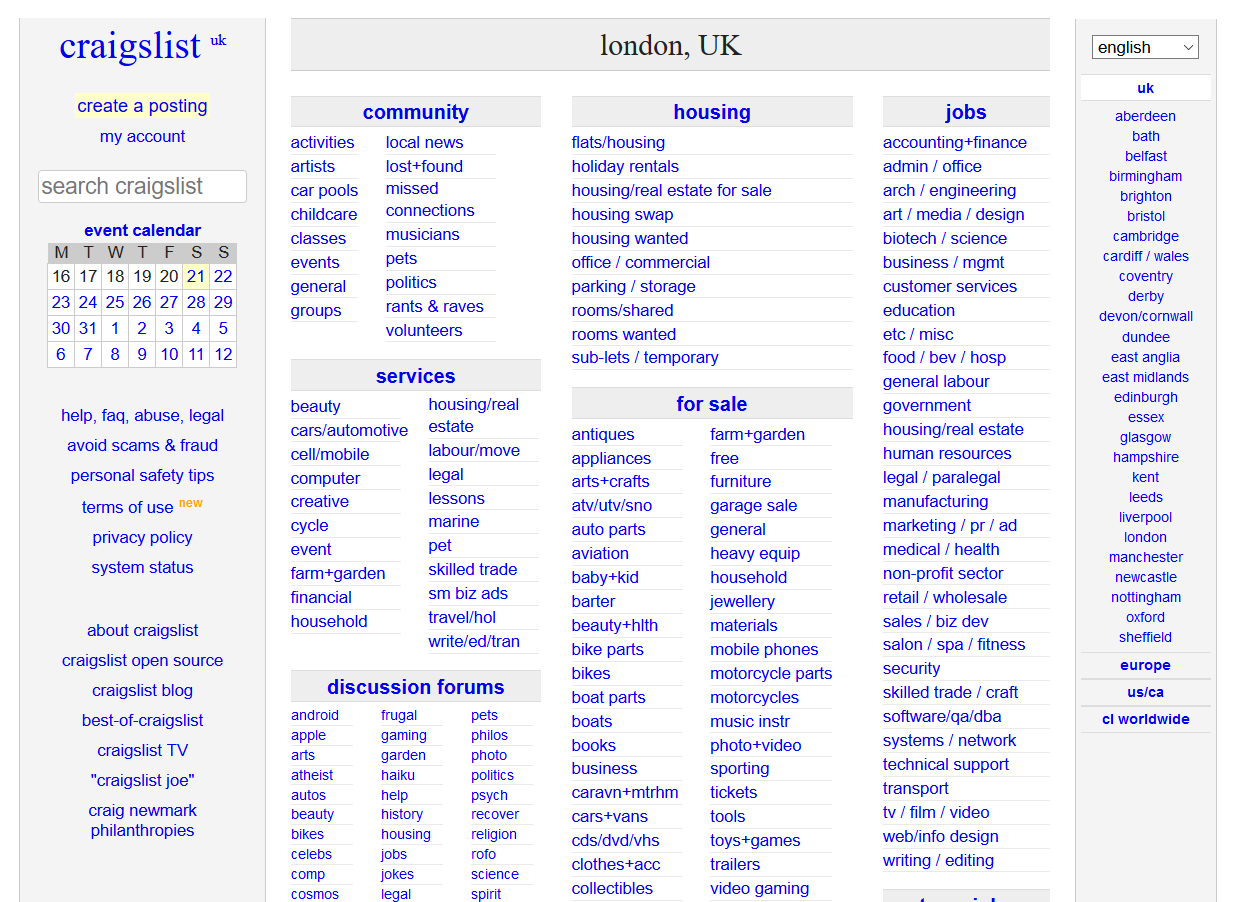
As you can see with the Craigslist homepage above, there is very little in the way of excess, and possibly even less in the way of style. It’s barely changed in 20(!) years, because it hasn’t needed to. Take a look at the code and even a novice like me can follow how the pages are put together. You don’t have to guess how it’s built because it’s all right there in front of you.
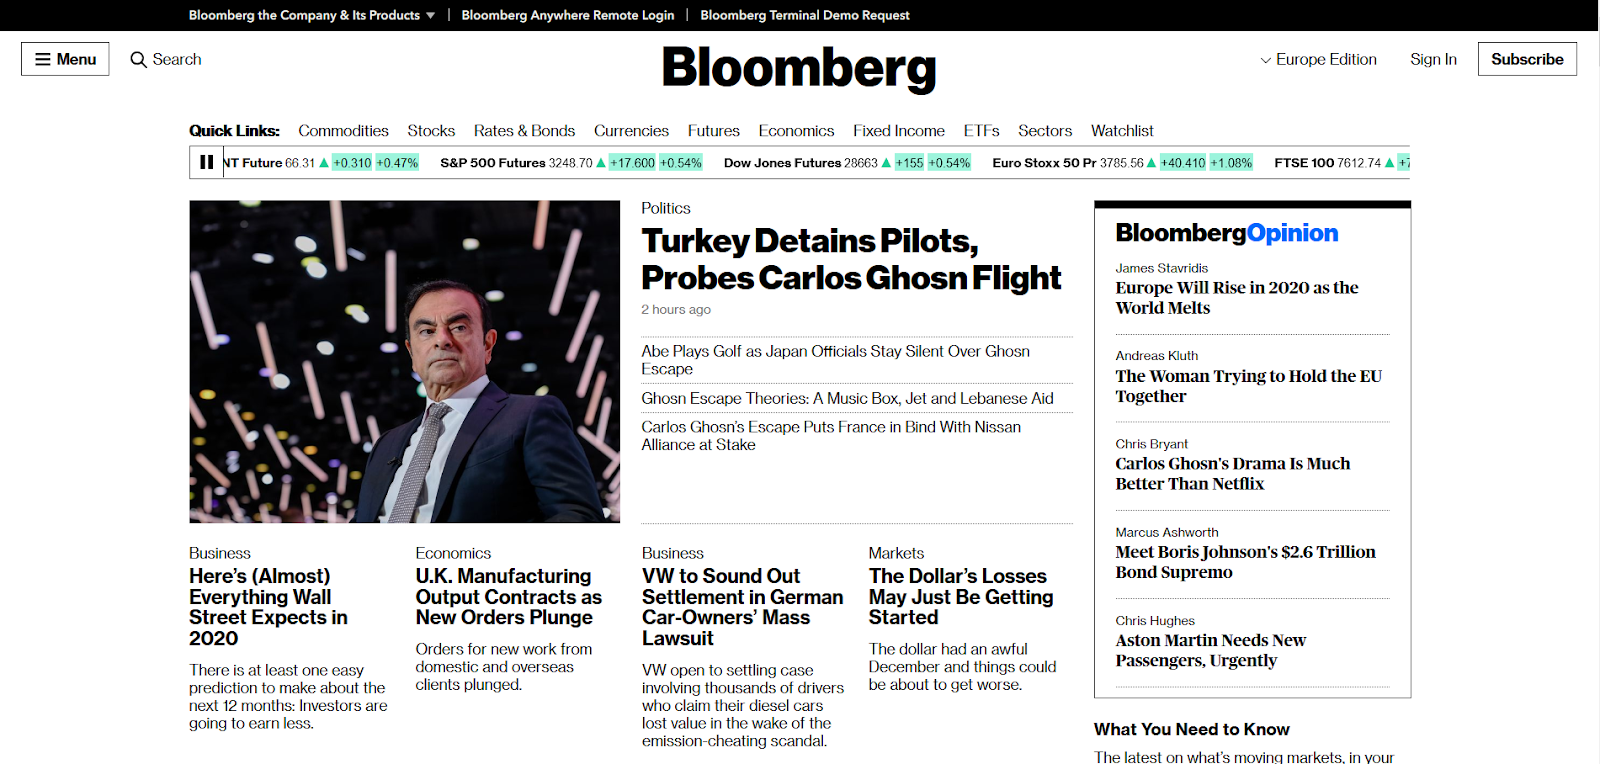
With sites like this you’ll often notice an overlap with the ‘publicly minded’ leaning on a lot of these websites — marketplaces, forums, encyclopedias. It’s oddly appropriate to see a site like Wikipedia take on the digital form of, say, Robin Hood Gardens. Bloomberg has plenty of company in the news space as well. Papers like The New York Times and The Washington Post have embraced similarly blunt, functional designs in recent years. News design has always had a strong brutalist streak.

It bears mentioning here that several of the sites used as examples here didn’t set out to be brutalist. Much like Villa Göth, which is widely considered the source of the term brutalism, they set out to be practical and simple. They were adopted, so to speak. Their success is what inspired (and continues to inspire) architects and developers alike. They’re so unconcerned about appearances that they became shining examples of brutalist design without even realizing it!
Sites in this vein don’t always scream beauty, but there is an elegance to their functionality. They are unconcerned and unpretentious, shaped for their purpose using the raw elements of the web. (Pun intended.)
سخن پایانی
بازاریابی و تبلیغات به رکن اساسی جامعه امروز ما تبدیل شده است. سئو و بهینه سازی سایت برای موتورهای جست و جو و همچنین تبلیغات گوگل ادوردز از جمله مهمترین روش ها برای بیشتر دیده شدن سایت شما به حساب می آید. شرکت پیام آوا خدمات طراحی سایت تهران و سئو را با مناسب ترین قیمت به شما ارائه می دهد.
TYPE TWO: L’INTERNET FOU
This is the split. Right here. Those of you with even a passing interest in web design trends will know what we’ve looked at so far fails to account for a huge number of ‘brutalist’ sites. As Vitaly Friedman noted in Smashing Book 6:
Brutalism in architecture is characterized by unconcerned aesthetics, not intentionally broken aesthetics. When applied to web design, this style often goes along with deliberately broken design conventions and guiding principles.
The rise of ‘brutalist’ design over the last few years has had a lot more to do with brutalness than with rawness. This is the madder world, at times bordering on anarchy. Here design conventions are subverted and usability is an afterthought — and that’s not when it’s being actively sabotaged. These are the sites that prompt articles titled ‘Style Over Substance’, and for The Washington Post to sum up the style as ‘intentionally ugly.’

In the suitably migraine-inducing article ‘Brutalism: BrutAl wEbsIteS for mOdern dAy webMAsTeRS’, Awwwards describes this second strain as follows:
Brutalism in web design laughs in the face of rationalism and functionality, in the world of design it can be defined as freestyle, ugly, irreverent, raw, and superficially decorative, etc.
I hope it isn’t controversial to say that this is an altogether different approach to type one. At a stretch, you might argue that this approach is more the domain of artists and graphic designers, and that art is, therefore, the rawest form their websites can take, but that would be a stretch. There’s no question brutalist architecture can drift into ‘statement’ territory, but that’s not its natural realm.
The Brutalist Websites directory suggests, ‘Brutalism [online] can be seen as a reaction by a younger generation to the lightness, optimism, and frivolity of today's web design.’ There are shades of the founding brutalist ethos in this, but it is more irreverent and subversive. They can be very beautiful in their own way, but also cut from a completely different cloth from the Craigslists of this world.
This Town Ain’t Big Enough For The Two Of Us
So there you have it. When brutalist web design isn’t going all in on rationalism and functionality, it’s laughing in the face of rationalism and functionality. All clear?
The term has grown to encompass approaches that are in many senses at odds with each other. Indeed, Pascal Deville, who founded the Brutalist Websites directory after coining the term in 2014, thinks the style has splintered into three micro-stylistics:
- Purists,
- UX minimalists,
- Anti-ists (or artists).
Having vetted hundreds of submissions over the years, he’d know better than just about anyone else. He says:
The purists reference strongly to the architectural characteristics of Web Brutalism, such as the concept of ‘truth to materials’ and the use of the purest markup elements available. The UX minimalists, in contrast, see efficiency and performance as the main driver of Web Brutalism and even believe that the radical limitation of possibilities can boost conversions. The ‘anti-ists’ or artists see web design as an (still) undervalued form of art and don’t show much respect the status quo and mostly get bad press.
What is a ‘proper’ brutalist website? To an extent, the answer depends on the context. If a website belongs to an artist then something brash may be more appropriate than something unconcerned. Generally speaking, though, it seems to me that the sensibilities of the ‘anti-ist’ type are actually much closer to something like Dadaism, with all its absurdity and mirth and mess, or the avant-garde leanings of Expressionism.


I don’t want this to come across as a game of semantics, where different styles are filed away neatly into little boxes. What I am more concerned with is highlighting different approaches so that each may be given the space needed to flourish. As Deville acknowledges, the creative potential of the web is still being explored. ‘It's a new form of art and I'm very happy to experience first hand,’ he says. ‘It's happening now.’
This has practical consequences as well. Whether you’re a developer talking to a client or a client talking to a developer, it pays to be clear which version of brutalist web design you’re on about. If you’re a real champ you’ll naturally refer them to this article. Otherwise, visual examples like the one below are likely your best bet for getting to the point.

Beyond that, maybe we should start giving different styles different names. I appreciate this would be rather inconvenient to a lot of people. Domains have been bought, awards awarded, and articles written, but going forward the label seems too restrictive. It can no longer contain so many approaches. If nothing else, the split personality of brutalist web development shows how much terrain remains to be explored in web design.
There are countless schools of art — Brutalism, Expressionism, Romanticism, Art Deco, Futurism, Dadaism, Impressionism, absurdism, modernism, minimalism, and on and on and on. They find form through paintings, buildings, literature… why not websites? As the links below show, I’m not alone in asking this. With every new development style, ‘anti-mainstream’ becomes less adequate for describing what designers are doing. They are starting to explore the philosophy of web design in ways that haven’t been done before.
- Nielsen Norman Group on the difference between brutalism and antidesign
- ‘On Web Brutalism and Contemporary Web Design’ in Dialectic
- Creative Bloq asks if brutalist websites are the web’s ‘punk moment’
- Nick Babich outlines the principles of minimalist web design, by far the most popular ‘ism’ online to date.
The ‘Dadaist’ strain of brutalist web design has one thing absolutely right: the scope for what a website can be is far, far too narrow. The web is an infinite sandbox, and embracing the breadth of possibilities within it can only be a good thing. That starts with expanding our vocabulary.
-------------------------------------------------------------------------------------------------------------------------------------
تبلیغات میان متنی/
درب شیشه ای چیست؟ا یکی از ملزومات دکوراسیون لوکس و مدرن ساختمان های امروز به حساب می آیند. قیمت درب شیشه ای را در سایت قائم الکتریک مشاهده کنید. همچنین درب ورودی ساختمان ها نیز برای حفظ امنیت عبور و مرور نیازمند تجهیزات راهبند است. قیمت راهبند را از قائم الکترونیک به راحتی دریافت کنید. تیم نکته عمومی و عامیانه این است که در شیشه ای یا همان درب شیشه ای به درب اتوماتیک شیشه ای اشاره دارند. درب شیشه ای در انواع مختلف را از قائم الکترونیک بخواهید.
تبلیغات میان متنی
----------------------------------------------------------------------------------------------------------------------------------------